11. October 2017
Use Azure Container Instances for NAV
Running NAV inside a Container has many benefits but one of the probably most obvious ones when you start to work with it is the ease of deployment: Running a NAV container with SQL and WebClient embedded is as easy as docker run -e ACCEPT_EULA=Y navdocker.azurecr.io/dynamics-nav1. But that assumes that you have Docker installed and running and to keep it running you’ll need to maintain it. By no means a big effort but how about eliminating even that?
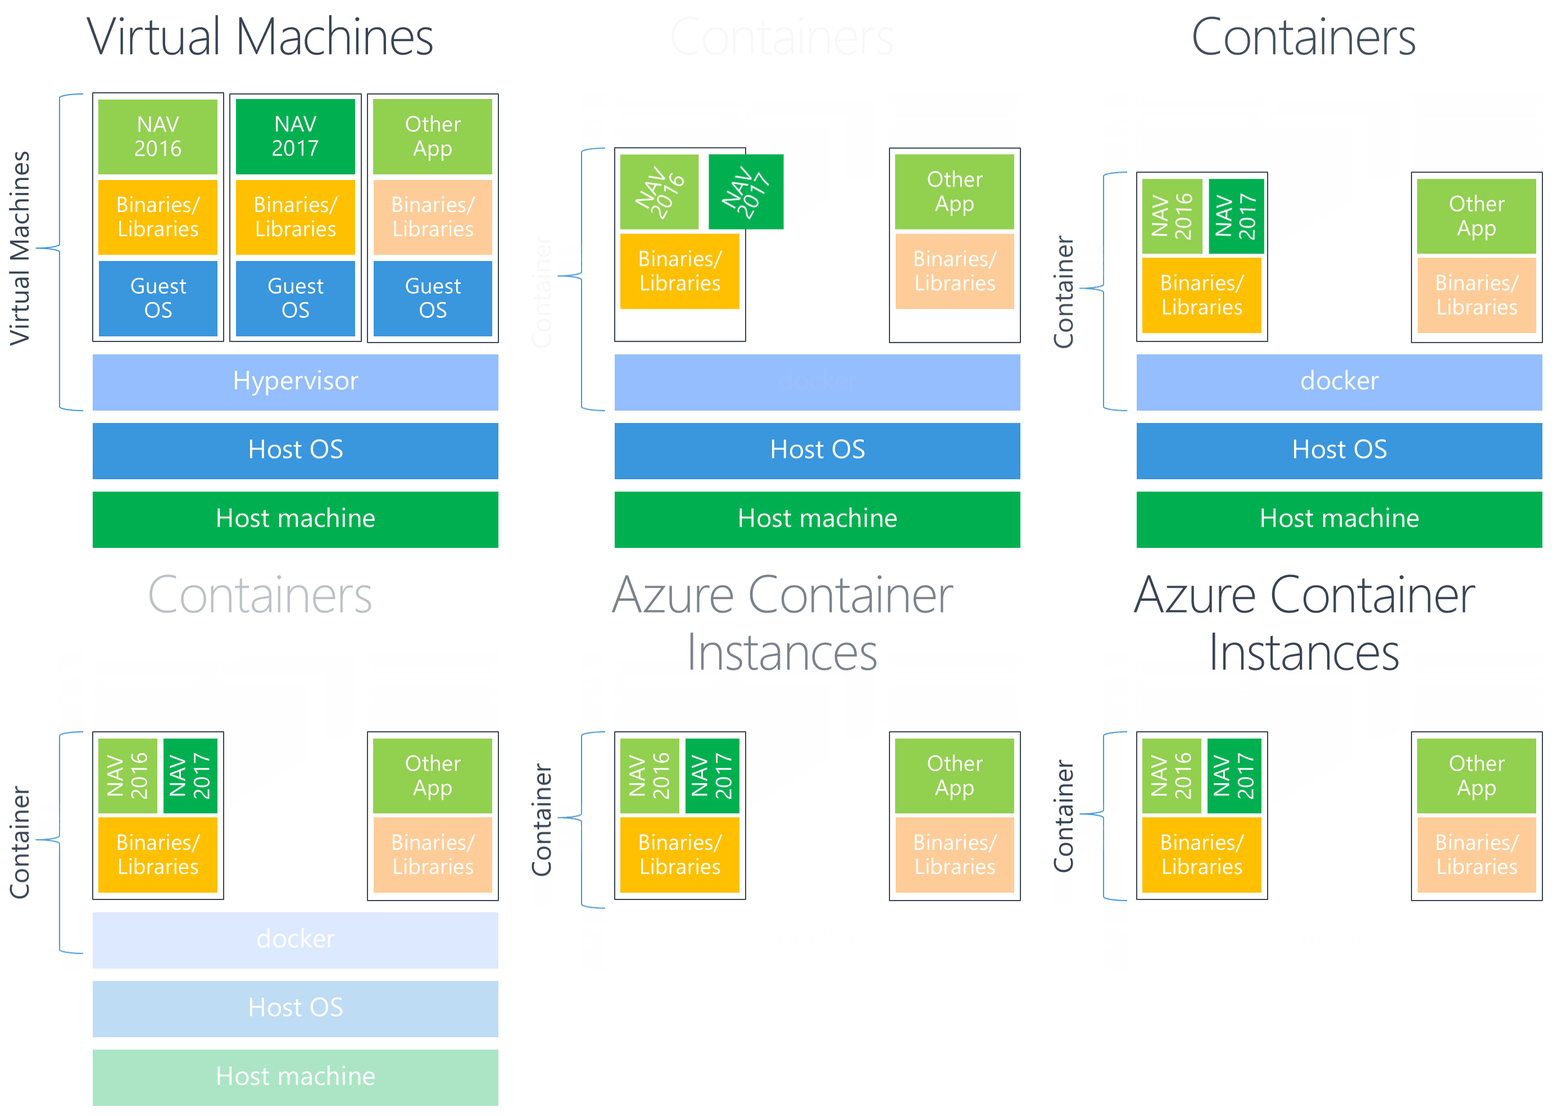
This is where Azure Container Instances come into play. Container Instances are a relatively new addition to Azure and currently in preview, but already supporting Windows Containers. Azure Container Instances have roughly the same effect on a Docker / Windows Container environment that Azure has on a virtualization environment: You move the abstraction one level up and with that don’t need to care about the levels below anymore. With Azure VMs you no longer have to care about the infrastructure and the hypervisor but if you run Docker inside it, you still need to maintain that. With Azure Container Instances you no longer have to care about infrastructure, hypervisor and Docker. All you need to do is provide an image, some parameters and after waiting for a bit, your Container instance – in our case a SQL Server, NAV Server and WebClient – is up and running. Freddy Kristiansen, Jakub Vanak and I tried to explain that in our recent sessions at Directions NA and Directions EMEA with the following image2. The first morph shows that the move from VMs to Containers eliminates the need to worry about Guest OSes in VMs3. The second morph shows that with Azure Container Instances even Docker itself gets taken care of, so really all we need to worry about are the containers themselves. See how many of the boxes just disappear and with them the need to install, maintain and update? That definitely means that your control over them also disappears to some degree but depending on your scenario you don’t need that control anyways or you are willing to sacrifice control for ease of use and speed
So much for a very quick introduction into Azure Container Instances. If you want to really know what they can do, I’d suggest the initial announcement and the documentation4, but I hope you got the idea from my description as well and understand why it matters. So, how can we use that with NAV? It is extremely easy:
- Get an Azure subscription and log in to portal.azure.com
- Open a Cloud Shell, another nice recent addition to Azure. I’ll use the bash-based flavor5
- Create a resource group (necessary prereq for a Container Instance) with
az group create --name navGroup --location WestEurope
- Create the Container Instance with
az container create --name navcontainer --image navdocker.azurecr.io/dynamics-nav:devpreview-finus --registry-login-server navdocker.azurecr.io --registry-password "<password>" --resource-group navgroup --registry-username "<username>" --os-type Windows --cpu 2 --memory 3 --environment-variables ACCEPT_EULA=Y --ip-address public --port 443
This creates a container with 2 cores and 3g memory based on the devpreview-finus image, publicly accessible through https. You’ll need to replace the username and password parameters with the correct values. If you don’t have them, ask Freddy Kristiansen or someone who attended one of our workshops.
- Wait for a couple of minutes as pulling and extracting the image takes some time. You can check the state with
az container show --resource-group navgroup --name navcontainer
- When you see
...
  "ip": "13.95.90.158",
...
  "provisioningState": "Succeeded",
...
  "state": "Running",
...
then you are done and you can connect to https://13.95.90.158/NAV/WebClient (check the container logs with
az container logs --resource-group navgroup --name navcontainerto find user and password). Or just wait until the Azure portal shows something like this where you can also see the state information and the IP address
In the end, you’ll have something like this (which could be running anywhere but actually is a Azure Container Instance)
So, as a recap: If you have an Azure subscription, you just need to enter two lines of code and wait a couple of minutes, and you can get your own Docker-based NAV in a Windows Container without installing anything! Microsoft, 
Update
As the NAV Docker images are now publicly available, step 4 above can now look like this and you don’t need the password for the private repo:
az container create --name navcontainer --image microsoft/dynamics-nav:devpreview-finus --resource-group navgroup --os-type Windows --cpu 2 --memory 3 --environment-variables ACCEPT_EULA=Y --ip-address public --port 443
I’ve also created an ARM template for this that got accepted at the Azure quickstart templates repo, so you actually can just go to the Azure github repo and hit “Deploy to Azure”. There you’ll have to accept the EULA, set a username and password for your NAV admin user and after a couple of minutes, you have your Azure Container Instance running NAV!
- on Windows Server 2016. On Windows 10, you’ll need to do
docker run -e ACCEPT_EULA=Y -m 2g navdocker.azurecr.io/dynamics-navbecause of the way containers and especially memory isolation works there. Sad! - this is a slightly simplified and hugely more animated version as we don’t need to stand next to it and won’t be embarrassed by it
- and a lot more, but for the current topic, I’ll oversimplify a bit although as a Docker fan it is tough not to mention all the goodness it brings
- by the way, remember the days when documentation across all vendors was horrible? A lot of them found good ways how to improve that, Microsoft being one of the best in my opinion
- Why? Because it works and I still find it funny to orchestrate a Windows Container Instance on Microsoft Azure with bash. But that’s just me, you can go for PowerShell as well, obviously with different syntax and commands


